
SharePoint is a great tool for sharing content and promoting learning. One of the ways it allows you to do that is through the use of promoted links. These are great tools that can help you ensure that all users know important information. Let's take a look at promoted links and how you can get started using them.
What are Promoted Links?
Promoted links are links to pages in SharePoint Online that you want to direct users to. These can range from day-to-day work materials to important policy documents. They are a fantastic organizational tool that lets your employees know what resources they should be looking at and using. As a bonus, they also help keep your site organized and ease navigation for users who might not be very adept at using SharePoint Online. That said, let's take a look at some of the ways that you can get started adding Promoted Links to your sites in SharePoint Online.
The Quick Links Web Part
Using the Quick Links Web Part is one of the easiest ways to add promoted links to your SharePoint site pages. Let's take a look at how to set up the Quick Links Web Part in SharePoint Online.

- Make sure that you are logged into an account with editing permissions.
- Go the page that you want to add the Quick Links Web Part.
- Click Edit at the top right of the page.
- Click the circled + to add a new web part and then select the Quick links web part.
- Add a title to your web part.
- Click Edit web part to begin setting it up.
- Select the layout that you want to use. You can set the layout to be Compact, Filmstrip, Grid, Button, List, or Tiles. You will also have the option to show an image in the layout.
Now that you've set up your Quick Links Web Part, it's time to start adding links.
- Click + Add.
- Choose the file or image that you want to promote.
- Click Open.
- On the right you'll see options for each link. You can change the Title, Thumbnail, and add a Description.
Now that you've added your Quick Links, let's take a look at how to edit the links in your SharePoint Online Quick Links Web Part.
- Find the quick link that you would like to edit.
- Click Edit.
- Here you'll be able to change anything you want about the link including the Link, Title, Thumbnail, and Description.
Now let's take a look at what you need to do to delete a Quick Link in the Quick Links Web Part in SharePoint Online.
- Go to the Quick Link that you wish to remove.
- Click Remove.
This is by far the easiest and most customizable way to add promoted links to SharePoint pages. The Quick Links Web Part is super flexible and can be fit anywhere on a page where you'd want or need it.
The Highlighted Content Web Part
If you're not looking to feature an assortment of content instead of specific links, then the Highlighted Content Web Part should be what you're looking for.
What is the Highlighted Content Web Part?
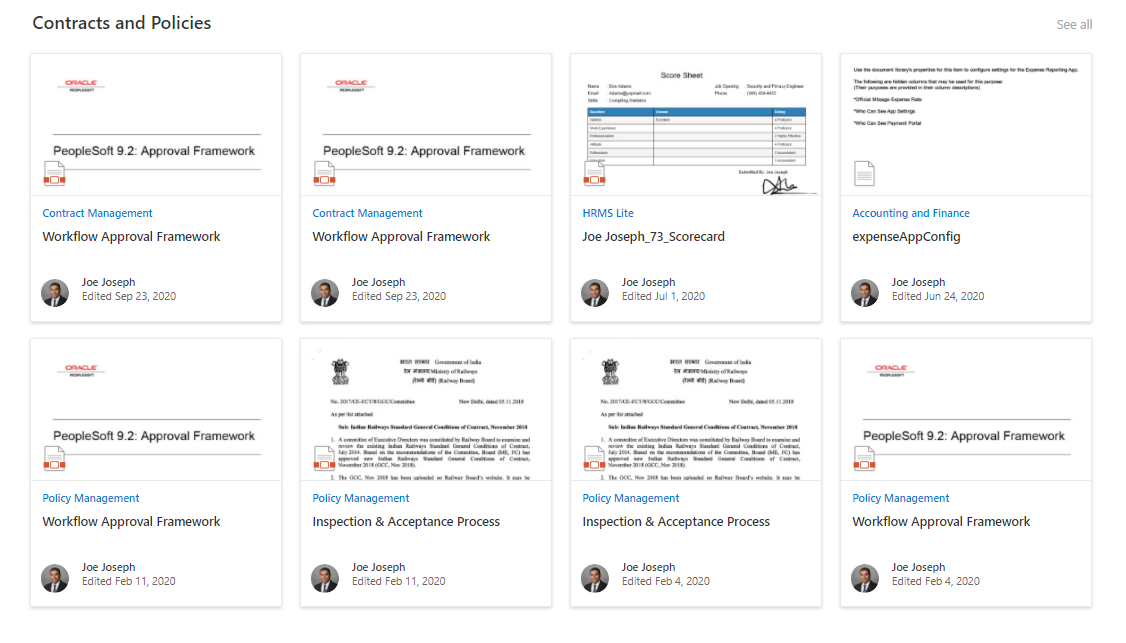
The Highlighted Content Web Part in is a SharePoint Online Web Part that dynamically displays content from different parts of your SharePoint site. The web part shows your recent documents by default, but with some customization you can change this.
How to Add the Highlighted Content Web Part in SharePoint Online
- Make sure that you are logged into an account with editing permissions.
- Go the page that you want to add the Highlighted Content Web Part.
- Click Edit at the top right of the page.
- Click the circled + to add a new web part and then select Highlighted Content Web Part. As we said previously, this will show your most recent documents by default.
- Once added, click the Edit button to begin making changes.
How to Choose Content for the Highlighted Content Web Part in SharePoint Online
- On the right you'll see the settings for the Highlighted Content Web Part.
- In the Source section, choose the source of the documents you want to promote. You have the following options:
- This site.
- A Document library on this site.
- This site collection.
- This page library on this site.
- All sites in the hub.
- Select sites.
- All sites.
- In the Type section, choose the type of content you're looking to promote. This will vary depending on your source.
How to Filter and Sort Content for the Highlighted Content Web Part
Now that you've selected the source and type of content, you can now set filters to organize the content.
- In the Filter section you'll be able to choose how you filter the content. Here are your choices:
- Title includes the words.
- Content includes the words.
- Recently added.
- Recently changed.
- Created by.
- Modified by.
- Managed property.
- In the Sort by section, choose the option you want. They are as follows:
- Most recent (default option).
- Most viewed.
- Trending.
- Managed property ascending.
- Managed property descending.
Note: it's best to use multiple filters if you are looking for a more curated experience.
After you've set all this up, you'll be able to change the layout. You can choose between Cards, List, Filmstrip, or Carousel. After that you'll be able to choose how many items are displayed at any time.
The Hero Web Part
The Hero Web Part functions similarly to the Quick Links Web Part. However, it puts more of an emphasis on the visual aspects. The Hero Web Part is a great fit for promoting links on your SharePoint Home Page as it is visually appealing.

There is one thing we should note before we continue. By default, the Hero Web Part is included in your Communication Sites and it will come with an assortment of default images/text/links that you'll be able to change.
How to Modify the Hero Web Part in SharePoint Online
- Go to the page that contains the Hero Web Part you want to edit.
- Click Edit on the top right of the page.
- Click Edit web part on the web part to begin making changes.
- On the right you will see multiple options. Layout options allows you to choose between Tiles and Layers. The Layout section lets you modify the number of tiles or layers on display.
How to Change Links in the Hero Web Part in SharePoint Online
- Go to the tile or layer that you want to change in the Hero Web Part.
- Click Edit details at the bottom right of the tile/layer.
- Click Change and choose the location where you get the link. You will have the following options:
- Recent.
- Stock images.
- Web search.
- Your organization.
- OneDrive.
- Site.
- Upload.
- From a link.
- Once you've selected what you want to promote, click Open.
- Under Image, you can either select to use a Custom image or Color only. You can also choose the Auto-selected option which will have SharePoint pull an image from the page/document you're promoting.
- Enter Alternative text for the image if you wish.
How to Add a New Hero Web Part to a Page in SharePoint Online
Sometimes you want to add a Hero Web Part to promote links on a non Communication Site. Here's how to do that:
- Make sure that you are logged into an account with editing permissions.
- Go the page that you want to add the Hero Web Part.
- Click Edit at the top right of the page.
- Click the circled + to add a new web part and then select Hero Web Part.
- Once you've done this, follow the above instructions to promote links.
Conclusion
Promoted links can be a powerful tool for helping users get their bearings on your SharePoint sites. Just follow any of the above instructions to get started using them today. You can find more SharePoint tutorials like this on our blog so make sure to check back there everyday. If you are interested, you can also sign up for our mailing list and receive an email every time we publish a new blog.
Book a Live demo
Schedule a live demo of Dock 365's Contract Management Software now.